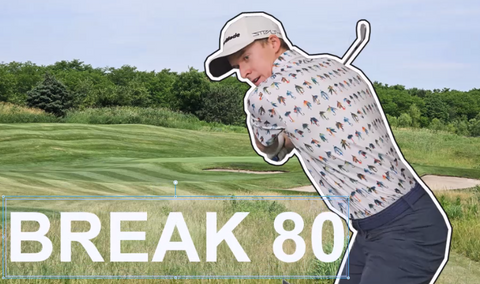
Creating a YouTube thumbnail that grabs attention is crucial for any content creator aiming to stand out in a crowded digital space. Whether your focus is on golf or any other niche, the principles of effective thumbnail design remain the same.
This guide will take you through the essential steps to create engaging and visually appealing thumbnails that attract viewers and enhance your video's click-through rate.
If you learn better visually, please check out the YouTube channel for a detailed video on how to make a YouTube thumbnail.
Be sure to Subscribe to our channel for more golf related content, motivational videos trying new things, or you just want to join a community of positive people.
Now, here's how to quickly and easily make great thumbnails for YouTube.
The first thing we want to do is get a shot of ourselves. In this example, we are making a sample thumbnail that I would normally make for a golf vlog video, but the steps today can be applied to any channel.

Body Shot
It's actually a little hard to get a good shot of yourself if you are just taking still photos, so what I recommend you do is record a video of yourself on your phone. Make sure you record in a high resolution like 4K (as well as 60fps) so the image looks sharp, then just strike a bunch of action poses and we can pick a good shot from there.

If you want to save even more time, if you've already recorded your round of golf, you can go through the videos and find a cool action shot, then take a snippet from that.
Background
For the background, I will typically take some nice scenic pictures when I am walking the course, so I will usually use one of those.

If you are grabbing a random picture off the internet, be sure it is from a source that doesn’t require a license to use that photo.
Send both of the images to your PC and start editing.
Editing
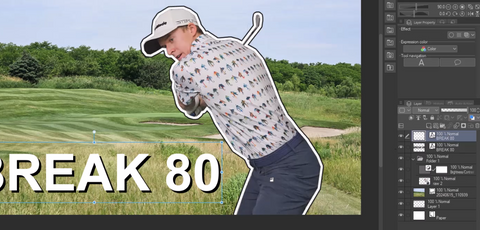
In this example I will be editing with some software I already owned before starting YouTube called Clip Studio Paint. There's other great software's out there like Canva or Adobe products, but for what I am going to show you today, we can pretty much use all the tools in the same way.
Open up your editing software, create a new project, and for YouTube thumbnails, the canvas size you want is 1280x720.
Import both pictures (silhouette and background) into the project and then adjust the sizes and position.

Next we need to remove the background from our silhouette image, some software have really fancy AI background removal features, but I will typically just use the poly line select tool and draw around myself to remove the background.

In my software I have to convert the image into a "raster layer" before I can make these edits, but again in newer software it's probably more automatic.
Once you've outlined your silhouette, you can go ahead and delete the outside selection to get rid of the background. I will make some final adjusts to the size, then I like to add some nice contrasting outlines to really make it pop.
Just select the color and number of pixels you want the outline to be and done.

The last thing we want to do to the silhouette is adjust the brightness and contrast.
I will go ahead and add in a new folder and add a correction layer (Right click, new correction layer), you can just adjust these sliders to my liking. I will typically tone down the contrast so my forehead isn't so shiny, but make sure this only applies to the layer of our silhouette, and not the background.

For the background, we can apply the same process to add things like a blur, to really make ourselves pop in the thumbnail.
The last thing we need to do is add in some text. I will just go ahead and click the text tool and add in whatever I want to say. Then I will go ahead and adjust the size and position until it looks good, typically I will keep the text towards the top so it doesn’t get cutoff by the preview timer at the bottom of the thumbnail.

Once I have it how I want it to look, I want to add some shadows so that the text is easier to read. What I typically do is duplicate this layer, change the text to black, and move it slightly so it looks like it's casting a shadow. Then I will turn down the opacity on the black layer to soften it up a bit.

And that's it, a super fast and easy way to make a quality YouTube thumbnail!
If you guys enjoyed this guide or found some of the tips useful, be sure to Subscribe to the channel, I am always trying to create educational and entertaining content.
As always, I look forward to seeing you out on the course!

